Purpose: Learn all about Kizen's email subscription lists and how to easily manage your Contacts' communication preferences for targeted, effective email campaigns that comply with email marketing regulations.
TABLE OF CONTENTS
- What are Subscription Lists and Subscription Statuses?
- How to Create Custom Subscription Lists
- How to Find a Contact's Subscription List Status
- How to Change a Subscription Status
- Related Articles
- Still Need Help?
What are Subscription Lists and Subscription Statuses?
In Kizen, not only can you manage all of your clients and leads and send them custom emails from a single place, but you can also easily customize and automate the types of email communication they receive. Kizen's subscription lists allow you to segment your email audiences into distinct mailing lists (such as marketing content, customer updates, newsletters, etc.). Each Contact can choose to either opt in to or opt out of receiving these different types of emails, which will automatically update their subscription status for each subscription list on the Contact record itself.
This means you can filter your Contacts based on their subscription list preferences and only send the relevant email from your email template library to this filtered group, ensuring you're building more targeted, effective email campaigns, and complying with email marketing regulations.
⚠️ Note: It's important to distinguish specific subscription list statuses from the "Email Status" field on the Contact record, which shows whether or not the Contact consents to receiving emails from your business. While subscription list statuses simply help you filter and create Contact groups, a Contact's Email Status can actually prevent the Contact from receiving emails from your integrated inbox.How to Create Custom Subscription Lists
There are default subscription lists that are automatically added to your Kizen account, but you can edit these existing lists or add new subscription lists at any time.
- Select Settings or Platform > Settings on your top toolbar menu.
- In your account settings, select the Privacy Settings tab.

- To edit existing subscription lists, click on the "..." menu under the Actions column.
- To add a new subscription list, select the green "+Add Subscription List" button.
- Fill out the required fields and choose the frequency with which you will be sending emails to this list. Toggle on "Auto Add Contacts to List" if you would like to automatically add new contacts to this list.
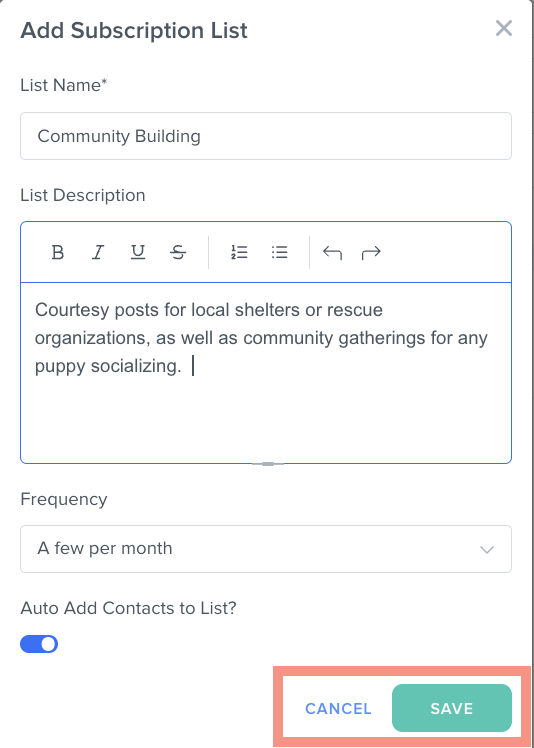
- Select the green Save button.
How to Find a Contact's Subscription List Status
As noted above, a subscription list status and an Email Status field work in tandem to manage communications in Kizen:
- A contact must have a positive Email Status ("Opted In") to receive any emails.
- The Contact's subscription list statuses then let you know which specific types of emails they would like to receive.
For example, if a Contact's email status is "Opted In," but they have opted out of the "Marketing Content" subscription list, you can still send them emails from Kizen, but it's important to avoid sending them marketing emails in order to maintain a positive relationship.
To check a Contact's subscription statuses, click on the Messages tab in the Contact record.
 There are 4 email statuses in Kizen:
- Not Opted In: This is the default status. The Contact has neither opted in nor opted out of receiving emails from you.
- Opted In: The Contact has explicitly authorized you to send them emails from your business.
- Unsubscribed From All: The Contact has chosen to unsubscribe from all of your subscription lists, but you can still manually send them individual emails.
- Suppression List: The Contact has marked your email as spam, or there has been a "hard bounce" and they will not receive any emails from your business. If the Contact would like to be removed from the suppression list, you can reach out to our Support team at support@kizen.com with proof of authorization from the Contact.

How to Change a Subscription Status
To change your client's subscription status:
- In the Contact record, select the Messages tab.
- Select the "..." menu next to the Subscription list you want to edit.
- Select "Mark Opted In" to opt the Contact back in to receiving emails for that subscription list.
- Select "Mark Opted Out" if the Contact no longer wants to receive emails for that subscription list.

Related Articles
- Integrated Inbox Overview: Connect Your Email Account to Send and Track Emails
- How to Create a Custom Email in Kizen
- How to Send Emails To Your Contacts
Still Need Help?
If you encounter any issues, contact support@kizen.com.
Was this article helpful?
That’s Great!
Thank you for your feedback
Sorry! We couldn't be helpful
Thank you for your feedback
Feedback sent
We appreciate your effort and will try to fix the article