Purpose: Learn how to upload a recording from the Kizen Voice App to an existing or new Contact in your AgentCRM, and how to track the upload and Meeting Assistant processing status.
TABLE OF CONTENTS
- Prerequisites
- How to Upload a Recording in the Kizen Voice App
- How to Upload a Recording Later in the Kizen Voice App
- How to Track Recording Upload and Processing Status
- How to View the Recording Transcript
- How to View All Recordings
- Related Articles
- Still Need Help?
Prerequisites
Before setting up or using Kizen Voice, confirm each of the following. If any item is not in place, stop and contact your AgentCRM administrator before continuing.
✅ Device: This guide covers iPhone and Android experiences.
✅ Permissions: You must have “Create and Edit” permissions on the Integrated Phone Calls object in Kizen AgentCRM. Without this, recordings will not upload or process correctly.
✅ Kizen credentials: You will need your Kizen email address and your Kizen password. If you have trouble signing, contact Kizen support.
✅ Environment: During setup you will be asked to select your agency's Kizen environment (for example, Go or FMO). Selecting the wrong environment means your recordings will not be linked to the correct business.
How to Upload a Recording in the Kizen Voice App
As soon as you finish a recording, Kizen Voice takes you to the Upload Recording screen, where you'll attach the recording to a Contact in AgentCRM before it can be processed by Kizen Meeting Assistant. Nothing is uploaded automatically until you complete this step.
Review the Recording on the Upload Screen
- The Upload Recording screen opens automatically after you save the recording.
- A waveform preview of your recording appears at the top, showing the date, time, and duration.
- Below it, the screen reads: "Search for a contact below to attach this recording. Once selected, the audio will be uploaded and processed for transcription and analysis."
Find an Existing Contact
- Tap the Search contacts field.
- Type the existing Contact's name in your AgentCRM. Results appear as you type, each showing the contact's name, email address, phone number, and date of birth.
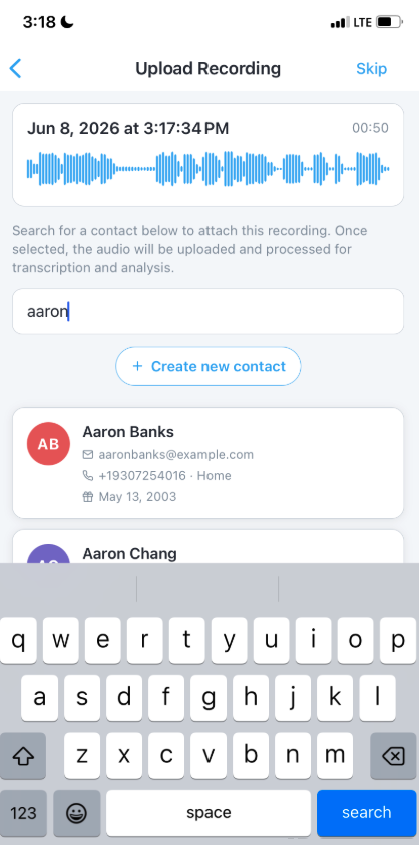
- If you do not see the contact, check your spelling or try searching by email.
(Optional) Create a New Contact
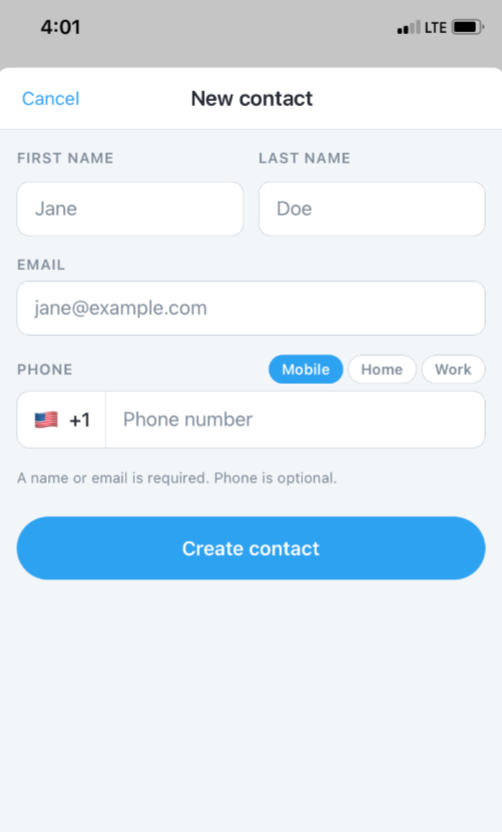
- If the contact does not exist in Kizen yet, tap + Create new contact to create a new record to attach the recording.
- On the New Contact page, enter the Contact's information:
- Tap the First Name field and enter the Contact's first name.
- Tap the Last Name field and enter the Contact's last name.
- Tap the Email field and enter the Contact's email address. This must be a unique email address that does not already exist in your AgentCRM.
- (Optional) Under Phone, select Mobile, Home, or Work, then enter the contact's phone number.
- Tap Create contact, or tap Cancel if the top left corner at any time to close the form without creating a Contact.
Confirm the Upload
- Select the correct Contact. A Confirm upload pop-up appears: "This action will upload the recording and process it for [Contact Name] ([email address]). Would you like to proceed?"
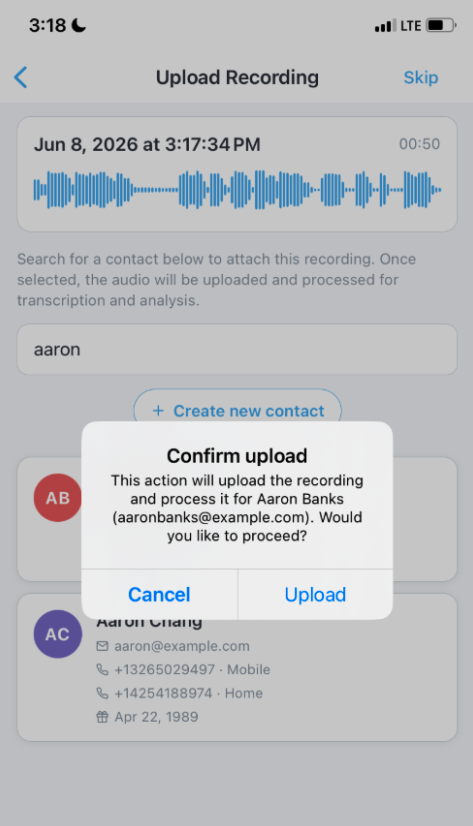
- Tap Upload to confirm and begin the upload. (Tap Cancel if you selected the wrong contact. You will return to the search screen to try again.)
- Once the recording finishes processing, log into your AgentCRM in the web browser and review the AI Meeting Assistant activities to confirm the extracted data and follow-ups.
How to Upload a Recording Later in the Kizen Voice App
- If you are not ready to link the recording to a contact, tap Skip in the top right corner of the Upload Recording screen.
- The recording is saved to your device and will appear under Not Uploaded in your recordings list.
- To upload it later, open the recordings list, find the recording under Not Uploaded, and tap Upload on the right side of the entry.
Offline recording: If you recorded without an internet connection or while logged out, don’t worry. The recording will be saved locally to your device. Once you are back online and logged in, find it under Not Uploaded and follow the upload steps above to add it to your Contact.
How to Track Recording Upload and Processing Status
After tapping Upload on a recording, you can check on it at any point to see where it stands, from uploading through completed processing. Statuses update automatically.
| Status | What it Means |
| Uploading | The recording is actively being sent to your Kizen AgentCRM. |
| Uploaded | Your Kizen AgentCRM has received the recording and it is queued for processing. |
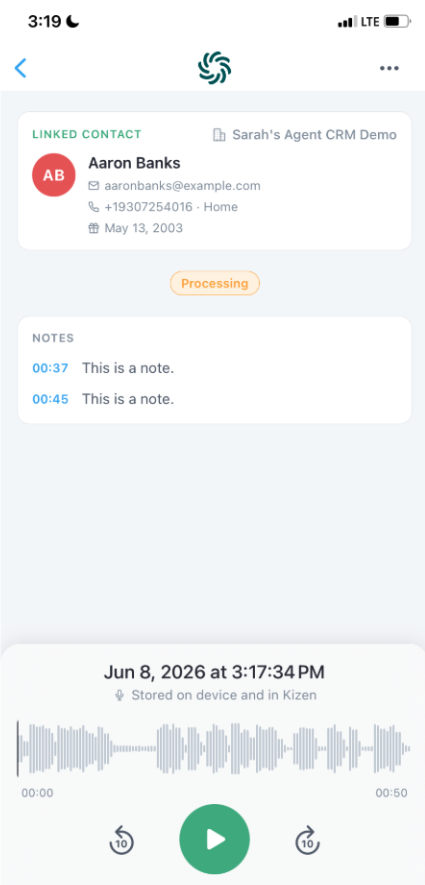
| Processing | Your Meeting Assistant is transcribing the recording and extracting information. This takes a few seconds to a few minutes depending on recording length. |
| Conversion failed | The recording could not be converted into a format Kizen can process. |
| Processing completed | Transcription is done. The transcript is visible in the Player screen and review activities have been assigned to you in Kizen. |
| Processing failed | Kizen was unable to complete transcription or extraction for this recording. |
| Upload failed | The upload did not complete. |
Once the upload succeeds, the text beneath the recording timestamp changes from "Stored from device" to "Stored on device and in Kizen."
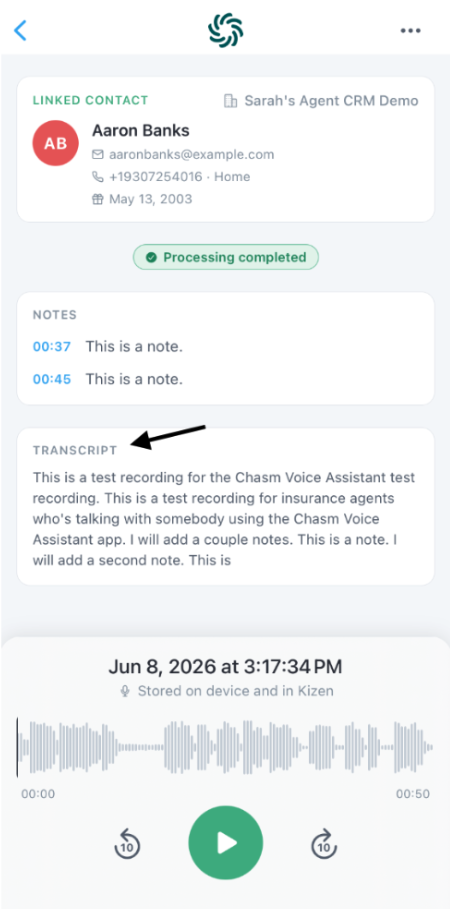
How to View the Recording Transcript
- Once the status shows Processing completed, open the recording from your recordings list.
- Scroll down past the Notes section.
- A Transcript section appears with the full text of the conversation.
How to View All Recordings
- Tap the back arrow from the Player screen to return to the recordings list.
- The recordings will be labeled as:
- Processing completed: Recordings currently uploading or being processed, including any failed uploads.
- Not Uploaded: Recordings saved on your device not yet linked to a contact. Each has an Upload button on the right.
- Uploaded: All recordings successfully sent to Kizen with their current status shown.
- Tap any recording to open its Player screen.
Related Articles
- AgentCRM: Kizen Voice App & Meeting Assistant User Guide
- AgentCRM: How to Record a Meeting in the Kizen Voice App
- AgentCRM: How to Manage Recordings in the Kizen Voice App
- AgentCRM: How to Review AI Meeting Assistant Activities
Still Need Help?
If you encounter any issues, contact support@kizen.com.
Was this article helpful?
That’s Great!
Thank you for your feedback
Sorry! We couldn't be helpful
Thank you for your feedback
Feedback sent
We appreciate your effort and will try to fix the article